Quantcast
Channel: Planet Ubuntu
Viewing all 17727 articles
Browse latest View live

Full Circle Magazine: Full Circle Weekly News #135

$
0
0

Linux Command Line Editors Vulnerable to High Severity Bug
https://threatpost.com/linux-command-line-editors-high-severity-bug/145569/

KDE 5.16 Is Now Available for Kubuntu
https://news.softpedia.com/news/kde-plasma-5-16-desktop-is-now-available-for-kubuntu-and-ubuntu-19-04-users-526369.shtml

Debian 10 Buster-based Endless OS 3.6.0 Linux Distribution Now Available
https://betanews.com/2019/06/12/debian-10-buster-endless-os-linux/

Introducing Matrix 1.0 and the Matrix.org Foundation
https://www.pro-linux.de/news/1/27145/matrix-10-und-die-matrixorg-foundation-vorgestellt.html

System 76’s Supercharged Gazelle Laptop is Finally Available
https://betanews.com/2019/06/13/system76-linux-gazelle-laptop/

Lenovo Thinkpad P Laptops Are Available with Ubuntu
https://www.omgubuntu.co.uk/2019/06/lenovo-thinkpad-p-series-ubuntu-preinstalled

Atari VCS Linux-powered Gaming Console Is Now Available for Pre-order
https://news.softpedia.com/news/atari-vcs-linux-powered-gaming-console-is-now-available-for-pre-order-for-249-526387.shtml

Credits:
Ubuntu “Complete” sound: Canonical
 
Theme Music: From The Dust – Stardust

https://soundcloud.com/ftdmusic
https://creativecommons.org/licenses/by/4.0/


The Fridge: Ubuntu Weekly Newsletter Issue 583

$
0
0

Welcome to the Ubuntu Weekly Newsletter, Issue 583 for the week of June 9 – 15, 2019. The full version of this issue is available here.

In this issue we cover:

The Ubuntu Weekly Newsletter is brought to you by:

  • Krytarik Raido
  • Bashing-om
  • Chris Guiver
  • Wild Man
  • And many others

If you have a story idea for the Weekly Newsletter, join the Ubuntu News Team mailing list and submit it. Ideas can also be added to the wiki!

Except where otherwise noted, this issue of the Ubuntu Weekly Newsletter is licensed under a Creative Commons Attribution ShareAlike 3.0 License

Santiago Zarate: Permission denied for hugepages in QEMU without libvirt

$
0
0

So, say you’re running qemu, and decided to use hugepages, nice isn’t it? helps with performace and stuff, however a wild wall appears!

 QEMU: qemu-system-aarch64: can't open backing store /dev/hugepages/ for guest RAM: Permission denied

This basically means that you’re using the amazing -mem-path /dev/hugepages, and that QEMU running as an unprivileged user can’t write there… This is how it looked for me:

sudo -u _openqa-worker qemu-system-aarch64 -device virtio-gpu-pci -m 4094 -machine virt,gic-version=host -cpu host \ 
  -mem-prealloc -mem-path /dev/hugepages -serial mon:stdio  -enable-kvm -no-shutdown -vnc :102,share=force-shared \ 
  -cdrom openSUSE-Tumbleweed-DVD-aarch64-Snapshot20190607-Media.iso \ 
  -pflash flash0.img -pflash flash1.img -drive if=none,file=opensuse-Tumbleweed-aarch64-20190607-gnome-x11@aarch64.qcow2,id=hd0 \ 
  -device virtio-blk-device,drive=hd0

The machine tries to start, but utimately I get that dreadful message. You can simply do a chmod to the directory, use an udev rule, and get away with it, it’s quick and does the job but also there are few options to solve this using libvirt, however if you’re not using hugeadm to manage those pools and let the operating system take care of it, likely the operating system will take care of this for you, so you can look to /usr/lib/systemd/system/dev-hugepages.mount, since trying to add an udev rule failed for a colleague of mine, I decided to use the systemd approach, ending up with the following:


[Unit]
Description=Systemd service to fix hugepages + qemu ram problems.
After=dev-hugepages.mount

[Service]
Type=simple
ExecStart=/usr/bin/chmod o+w /dev/hugepages/

[Install]
WantedBy=multi-user.target

Elizabeth K. Joseph: Building a PPA for s390x

$
0
0

About 20 years ago a few clever, nerdy folks got together and ported Linux to the mainframe (s390x architecture). Reasons included because it’s there, and other ones you’d expect from technology enthusiasts, but if you read far enough, you’ll learn that they also saw a business case, which has been realized today. You can read more about that history over on Linas Vepstas’ Linux on the IBM ESA/390 Mainframe Architecture.

Today the s390x architecture not only officially supports Ubuntu, Red Hat Enterprise Linux (RHEL), and SUSE Linux Enterprise Server (SLES), but there’s an entire series of IBM Z mainframes available that are devoted to only running Linux, that’s LinuxONE. At the end of April I joined IBM to lend my Linux expertise to working on these machines and spreading the word about them to my fellow infrastructure architects and developers.

As its own architecture (not the x86 that we’re accustomed to), compiled code needs to be re-compiled in order to run on the s390x platform. In the case of Ubuntu, the work has already been done to get a large chunk of the Ubuntu repository ported, so you can now run thousands of Linux applications on a LinuxONE machine. In order to effectively do this, there’s a team at Canonical responsible for this port and they have access to an IBM Z server to do the compiling.

But the most interesting thing to you and me? They also lend the power of this machine to support community members, by allowing them to build PPAs as well!

By default, Launchpad builds PPAs for i386 and amd64, but if you select “Change details” of your PPA, you’re presented with a list of other architectures you can target.

Last week I decided to give this a spin with a super simple package: A “Hello World” program written in Go. To be honest, the hardest part of this whole process is creating the Debian package, but you have to do that regardless of what kind of PPA you’re creating and there’s copious amounts of documentation on how to do that. Thankfully there’s dh-make-golang to help the process along for Go packages, and within no time I had a source package to upload to Launchpad.

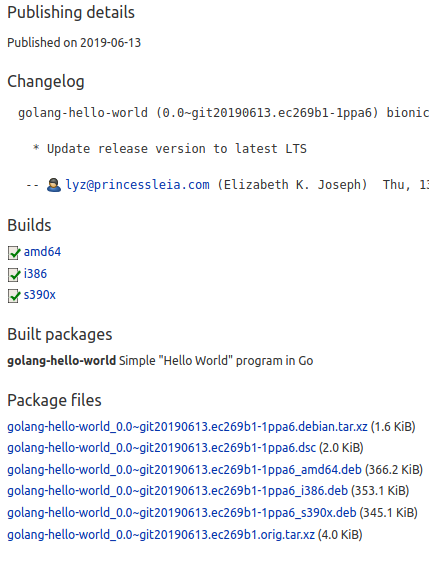
From there it was as easy as clicking the “IBM System z (s390x)” box under “Change details” and the builds were underway, along with build logs. Within a few minutes all three packages were built for my PPA!

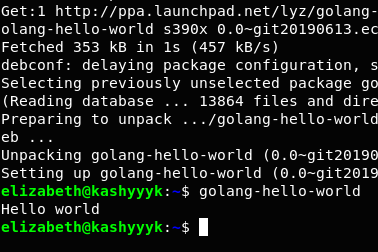
Now, mine was the most simple Go application possible, so when coupled with the build success, I was pretty confident that it would work. Still, I hopped on my s390x Ubuntu VM and tested it.

It worked! But aren’t I lucky, as an IBM employee I have access to s390x Linux VMs.

I’ll let you in on a little secret: IBM has a series of mainframe-driven security products in the cloud: IBM Cloud Hyper Protect Services. One of these services is Hyper Protect Virtual Servers which are currently Experimental and you can apply for access. Once granted access, you can launch and Ubuntu 18.04 VM for free to test your application, or do whatever other development or isolation testing you’d like on a VM for a limited time.

If this isn’t available to you, there’s also the LinuxONE Community Cloud. It’s also a free VM that can be used for development, but as of today the only distributions you can automatically provision are RHEL or SLES. You won’t be able to test your deb package on these, but you can test your application directly on one of these platforms to be sure the code itself works on Linux on s390x before creating the PPA.

And if you’re involved with an open source project that’s more serious about a long-term, Ubuntu-based development platform on s390x, drop me an email at lyz@ibm.com so we can have a chat!

Canonical Design Team: Your first robotic arm with Ubuntu Core, coming from Niryo

$
0
0

Niryo has built a fantastic 6-axis robotic arm called ‘Niryo One’. It is a 3D-printed, affordable robotic arm focused mainly on educational purposes. Additionally, it is fully open source and based on ROS. On the hardware side, it is powered by a Raspberry Pi 3 and NiryoStepper motors, based on Arduino microcontrollers. When we found out all this, guess what we thought? This is a perfect target for Ubuntu Core and snaps!

When the robotic arm came to my hands, the first thing I did was play with Niryo Studio; a tool from Niryo that lets you move the robotic arm, teach sequences to it and store them, and many more things. You can programme the robotic arm with Python or with a graphical editor based on Google’s Blocky. Niryo Studio is a great tool that makes starting on robotics easy and pleasant.

Nyrio studio for UbuntuNyrio Studio

After this, I started the task of creating a snap with the ROS stack that controls the robotic arm. Snapcraft supports ROS, so this was not a difficult task: the catkin plugin takes care of almost everything. However, as happens with any non-trivial project, the Niryo stack had peculiarities that I had to address:

  • It uses a library called WiringPi which needs an additional part in the snap recipe.
  • GCC crashed when compiling on the RPi3, due to the device running out of memory. This is an issue known by Niryo that can be solved by using only two cores when building (this can be done by using -j2 -l2 make options). Unfortunately we do not have that much control when using Snapcraft’s catkin plugin. However, Snapcraft is incredibly extensible so we can resort to creating a local plugin by copying around the catkin plugin shipped with Snapcraft and doing the needed modifications. That is what I did, and the catkin-niryo plugin I created added the -j2 -l2 options to the build command so I could avoid the GCC crash.
  • There were a bunch of hard coded paths that I had to change in the code. Also, I had to add some missing dependencies, and there are other minor code changes. The resulting patches can be found here.
  • I also had to copy around some configuration files inside the snap.
  • Finally, there is also a Node.js package that needs to be included in the build. The nodejs plugin worked like a charm and that was easily done.

After addressing all these challenges, I was able to build a snap in an RPi3 device. The resulting recipe can be found in the niryo_snap repo in GitHub, which includes the (simple) build instructions. I went forward and published it in the Snap Store with name abeato-niryo-one. Note that the snap is not confined at the moment, so it needs to be installed with the --devmode option.

Then, I downloaded an Ubuntu Core image for the RPi3 and flashed it to an SD card. Before inserting it in the robotic arm’s RPi3, I used it with another RPi3 to which I could attach to the UART serial port, so I could run console-conf. With this tool I configured the network and the Ubuntu One user that would be used in the image. Note that the Nyrio stack tries to configure a WiFi AP for easier initial configuration, but that is not yet supported by the snap, so the networking configuration from console-conf determines how we will be able to connect later to the robotic arm.

At this point, snapd will possibly refresh the kernel and core snaps. That will lead to a couple of system reboots, and once complete  those snaps will have been updated. After this, we need to modify some files from the first stage bootloader because Niryo One needs some changes in the default GPIO configuration so the RPi3 can control all the attached sensors and motors. First, edit /boot/uboot/cmdline.txt, remove console=ttyAMA0,115200, and add plymouth.ignore-serial-consoles, so the content is:

dwc_otg.lpm_enable=0 console=tty0 elevator=deadline rng_core.default_quality=700 plymouth.ignore-serial-consoles

Then, add the following lines at the end of /boot/uboot/config.txt:

...
# For niryo
init_uart_clock=16000000
dtparam=i2c1=on
dtparam=uart0=on

Now, it is time to install the needed snaps and perform connections:

snap install network-manager
snap install --devmode --beta abeato-niryo-one
snap connect abeato-niryo-one:network-manager network-manager

We have just installed and configured a full ROS stack with these simple commands!

Nyrio robotic arm in actionThe robotic arm in action

Finally, insert the SD card in the robotic arm, and wait until you see that the LED at the base turns green. After that you can connect to it using Niryo Studio in the usual way. You can now handle the robotic arm in the same way as when using the original image, but now with all the Ubuntu Core goodies: minimal footprint, atomic updates, confined applications, app store…

As an added bonus, the snap can also be installed on your x86 PC to use it in simulation mode. You just need to stop the service and start the simulation with:

snap install --devmode --beta abeato-niryo-one
snap stop --disable abeato-niryo-one
sudo abeato-niryo-one.simulation

Then, run Niryo Studio and connect to 127.0.0.1, as simple as that – no need at all to add the ROS archive and install manually lots of deb packages.

And this is it – as you can see, moving from a ROS debian based project to Ubuntu Core and snaps is not difficult, and has great gains. Easy updates, security first, 10 years updates, and much more, is a few keystrokes away!

The post Your first robotic arm with Ubuntu Core, coming from Niryo appeared first on Ubuntu Blog.

Canonical Design Team: Protected: Kubernetes on Windows

Canonical Design Team: Fresh snaps for May 2019

$
0
0

A little later than usual, we’ve collected some of the snaps which crossed our “desk” (Twitter feed) during May 2019. Once again, we bring you a suite of diverse applications published in the Snap Store. Take a look down the list, and discover something new today.

Cloudmonkey (cmk) is a CLI and interactive shell that simplifies configuration and management of Apache CloudStack, the opensource IAAS cloud computing platform.


snap install cloudmonkey


Got a potato gaming computer? You can still ‘game’ on #linux with Vitetris right in your terminal! Featuring configurable keys, high-score table, multi (2) player mode and joystick support! Get your Pentomino on today!

snap install vitetris


If you’re seeking a comprehensive and easy to use #MQTT client for #Linux then look no further than MQTT Explorer.


snap install mqtt-explorer


Azimuth is a metroidvania game, with vector graphics. Azimuth is inspired by such as the Metroid series (particularly Super Metroid and Metroid Fusion), SketchFighter 4000 Alpha, and Star Control II (a.k.a. The Ur-Quan Masters).


snap install azimuth


Familiar with Excel? Then you’ll love Banana Accounting’s intuitive, all-in-one spreadsheet-inspired features. Upgrade your bookkeeping with brilliant planning & fast invoicing. Journals, balance sheets, profit & loss, liquidity, VAT, and more!


snap install banana-accounting


Remember ICQ? We do! The latest release of the popular chat application is available for #Linux as an official snap! Dust off your ID and password, and get chatting like it’s 1996!


snap install icq-im


Déjà Dup hides the complexity of backing up your system. Déjà Dup is a handy tool, with support for local, remote and cloud locations, scheduling and desktop integration.


snap install deja-dup


Ktorrent is a fast, configurable BitTorrent, with UDP tracker support, protocol encryption, IP filtering, DHT, and more. Now available as a snap.


snap install ktorrent


Fast is a minimal zero-dependency utility for testing your internet download speed from terminal.


snap install fast


No matter which Linux distribution you use, browse the Snap Store directly from your desktop. View details about snaps, read and write reviews and manage snap permissions in one place.


snap install snap-store


Krita is the full-featured digital art studio. The latest release is now available in the Snap Store.


snap install krita


From Silicon Graphics machines to modern-day PCs, BZFlag has seen them all. This 3D online multiplayer tank game blends nostalgia with fun. Now available as a snap.


snap install bzflag


That’s all for this month. Keep up to date with Snapcraft on Twitter for more updates! Also, join the community over on the Snapcraft forum to discuss anything you’ve seen here.

Header image by Alex Basov on Unsplash

The post Fresh snaps for May 2019 appeared first on Ubuntu Blog.

Canonical Design Team: Kubernetes on Windows


Canonical Design Team: Kubernetes 1.15 now available from Canonical

$
0
0
Canonical widens Kubernetes support with kubeadm

Canonical announces full enterprise support for Kubernetes 1.15 using kubeadm deployments, its Charmed Kubernetes, and MicroK8s; the popular single-node deployment of Kubernetes.

The MicroK8s community continues to grow and contribute enhancements, with Knative and RBAC support now available through the simple microk8s.enable command. Knative is a great way to experiment with serverless computing, and now you can experiment locally through MicroK8s. With MicroK8s 1.15 you can develop and deploy Kubernetes 1.15 on any Linux desktop, server or VM across 40 Linux distros. Mac and Windows are supported too, with Multipass.

Existing Charmed Kubernetes users can upgrade smoothly to Kubernetes 1.15, regardless of the underlying hardware or machine virtualisation. Supported deployment targets include AWS, GCE, Azure, Oracle, VMware, OpenStack, LXD, and bare metal.

“Kubernetes 1.15 includes exciting new enhancements in application, custom resource, storage, and network management. These features enable better quota management, allow custom resources to behave more like core resources, and offer performance enhancements in networking. The Ubuntu ecosystem benefits from the latest features of Kubernetes, as soon as they become available upstream“ commented Carmine Rimi, Kubernetes Product Manager at Canonical.

What’s new in Kubernetes 1.15

Notable upstream Kubernetes 1.15 features:

  • Storage enhancements:
    • Quotas for ephemeral storage: (alpha) Quotas utilises filesystem project quotas to provide monitoring of resource consumption and optionally enforcement of limits. Project quotas, initially in XFS and more recently ported to ext4fs, offer a kernel-based means of monitoring and restricting filesystem consumption. This improves performance of monitoring storage utilisation of ephemeral volumes.
    • Extend data sources for persistent volume claims (PVC): (alpha) You can now specify an existing PVC as a DataSource parameter for creating a new PVC. This results in a clone – a duplicate – of an existing Kubernetes Volume that can be consumed as any standard Volume would be. The back end device creates an exact duplicate of the specified Volume. Clones and Snapshots are different – a Clone results in a new, duplicate volume being provisioned from an existing volume — it counts against the users volume quota, it follows the same create flow and validation checks as any other volume provisioning request, it has the same lifecycle and workflow. Snapshots, on the other hand, results in a point-in-time copy of a volume that is not, itself, a usable volume.
    • Dynamic persistent volume (PV) resizing: (beta) This enhancement allows PVs to be resized without having to terminate pods and unmount the volume first.
  • Networking enhancements:
    • NodeLocal DNSCache: (beta) This enhancement improves DNS performance by running a dns caching agent on cluster nodes as a Daemonset. With this new architecture, pods reach out to the dns caching agent running on the same node, thereby avoiding unnecessary networking rules and connection tracking.
    • Finaliser protection for service load balancers: (alpha) Adding finaliser protection to ensure the Service resource is not fully deleted until the correlating LB is also deleted.
    • AWS Network Load Balancer Support: (beta) AWS users now have more choices for AWS load balancer configuration. This includes the Network Load Balancer, which offers extreme performance and static IPs for applications.
  • Node and Scheduler enhancements:
    • Device monitoring plugin support: (beta) Monitoring agents provide insight to the outside world about containers running on the node – this includes, but is not limited to, container logging exporters, container monitoring agents, and device monitoring plugins. This enhancement gives device vendors the ability to add metadata to a container’s metrics or logs so that it can be filtered and aggregated by namespace, pod, container, etc.  
    • Non-preemptive priority classes: (alpha) This feature adds a new option to PriorityClasses, which can enable or disable pod preemption. PriorityClasses impact the scheduling and eviction of pods – pods are scheduled according to descending priority; if a pod cannot be scheduled due to insufficient resources, lower-priority pods will be preempted to make room. Allowing PriorityClasses to be non-preempting is important for running batch workloads – pods with partially-completed work won’t be preempted, allowing them to finish.
    • Scheduling framework extension points: (alpha) The scheduling framework extension points allow many existing and future features of the scheduler to be written as plugins. Plugins are compiled into the scheduler, and these APIs allow many scheduling features to be implemented as plugins, while keeping the scheduling ‘core’ simple and maintainable.
  • Custom Resource Definitions (CRD) enhancements:
    • OpenAPI 3.0 Validation: Major changes introduced to schema validation with the addition of OpenAPI 3.0 validation.
    • Watch bookmark support: (alpha) The Watch API is one of the fundamentals of the Kubernetes API. This feature introduces a new type of watch event called Bookmark, which serves as a checkpoint of all objects, up to a given resourceVersion, that have been processed for a given watcher. This makes restarting watches cheaper and reduces the load on the apiserver by minimising the amount of unnecessary watch events that need to be processed after restarting a watch.
    • Defaulting: (alpha) This features add support for defaulting to Custom Resources. Defaulting is a fundamental step in the processing of API objects in the request pipeline of the kube-apiserver. Defaulting happens during deserialisation, after decoding of a versioned object, but before conversion to a hub type. This feature adds support for specifying default values for fields via OpenAPI v3 validation schemas in the CRD manifest. OpenAPI v3 has native support for a default field with arbitrary JSON values.
    • Pruning: (alpha) Custom Resources store arbitrary JSON data without following the typical Kubernetes API behaviour to prune unknown fields. This makes CRDs different, but also leads to security and general data consistency concerns because it is unclear what is actually stored. The pruning feature will prune all fields which are not specified in the OpenAPI validation schemas given in the CRD.
    • Admission webhook: (beta) Major changes were introduced. The admission webhook feature now supports both mutating webhook and validation (non-mutating) webhook. The dynamic registration API of webhook and the admission API are promoted to v1beta1.
  • For more information, please see the upstream Kubernetes 1.15 release notes.

Notable MicroK8s 1.15 features:

  • Pure upstream Kubernetes 1.15 binaries.
  • Knative addon, try it with “microk8s.enable knative”. Thank you @olatheander.
  • RBAC support via a simple “microk8s.enable rbac”, courtesy of @magne.
  • Update of the dashboard to 1.10.1 and fixes for RBAC. Thank you @balchua.
  • CoreDNS is now the default. Thanks @richardcase for driving this.
  • Ingress updated to 0.24.1 by @JorritSalverda, thank you.
  • Fix on socat failing on Fedora by @JimPatterson, thanks.
  • Modifiable csr server certificate, courtesy of @balchua.
  • Use of iptables kubeproxy mode by default.
  • Instructions on how to run Cilium on MicroK8s by @joestringer.

For complete details, along with installation instructions, see the MicroK8s 1.15 release notes and documentation.

Notable Charmed Kubernetes 1.15 features:

  • Pure upstream Kubernetes 1.15 binaries.
  • Containerd support: The default container runtime in Charmed Kubernetes 1.15 is containerd. Docker is still supported, and an upgrade path is provided for existing clusters wishing to migrate to containerd. Both runtimes can be used within a single cluster if desired. Container runtimes are now subordinate charms, paving the way for additional runtimes to be added in the future.
  • Calico 3 support: The Calico and Canal charms have been updated to install Calico 3.6.1 by default. For users currently running Calico 2.x, the next time you upgrade your Calico or Canal charm, the charm will automatically upgrade to Calico 3.6.1 with no user intervention required.
  • Calico BGP support: Several new config options have been added to the Calico charm to support BGP functionality within Calico. These additions make it possible to configure external BGP peers, route reflectors, and multiple IP pools.
  • Custom load balancer addresses: Support has been added to specify the IP address of an external load balancer. This support is in the kubeapi-load-balancer and the kubernetes-master charms. This allows a virtual IP address on the kubeapi-load-balancer charm or the IP address of an external load balancer.
  • Private container registry enhancements: A generic images-registry configuration option that will be honored by all Kubernetes charms, core charms and add-ons, so that users can specify a private registry in one place and have all images in a Kubernetes deployment come from that registry.
  • Keystone with CA Certificate support: Kubernetes integration with keystone now supports the use of user supplied CA certificates and can support https connections to keystone.
  • Graylog updated to version 3, which includes major updates to alerts, content packs, and pipeline rules. Sidecar has been re-architected so you can now use it with any log collector.
  • ElasticSearch updated to version 6. This version includes new features and enhancements to aggregations, allocation, analysis, mappings, search, and the task manager.

For complete details, see the Charmed Kubernetes 1.15 release notes and documentation.

Contact us

If you’re interested in Kubernetes support, consulting, or training, please get in touch!

About Charmed Kubernetes

Canonical’s certified, multi-cloud Charmed Kubernetes installs pure upstream binaries, and offers simplified deployment, scaling, management, and upgrades of Kubernetes, regardless of the underlying hardware or machine virtualisation. Supported deployment environments include AWS, GCE, Azure, VMware, OpenStack, LXD, and bare metal.

Charmed Kubernetes integrates tightly with underlying cloud services and hardware – enabling GPGPU’s automatically and leveraging cloud-specific services like AWS, Azure and GCE load balancers and storage. Charmed Kubernetes allows independent placement and scaling of components such as etcd or the Kubernetes Master, providing an HA or minimal configuration, and built-in, automated, on-demand upgrades from one version to the next.

Enterprise support for Charmed Kubernetes by Canonical provides customers with a highly available, multi-cloud, flexible and secure platform for their cloud-native workloads and enjoys wide adoption across enterprise, particularly in the telco, financial and retail sectors.

The post Kubernetes 1.15 now available from Canonical appeared first on Ubuntu Blog.

Canonical Design Team: Parallel installs – test and run multiple instances of snaps

$
0
0

In Linux, testing software is both easy and difficult at the same time. While the repository channels offer great availability to software, you can typically only install a single instance of an application. If you want to test multiple instances, you will most likely need to configure the remainder yourself. With snaps, this is a fairly simple task.

From version 2.36 onwards, snapd supports parallel install – a capability that lets you have multiple instances of the same snap available on your system, each isolated from the others, with its own configurations, interfaces, services, and more. Let’s see how this is done.

Experimental features & unique identifier

The first step is to turn on a special flag that lets snapd manage parallel installs:

snap set system experimental.parallel-instances=true

Once this step is done, you can proceed to installing software. Now, the actual setup may appear slightly counter-intuitive, because you need to append a unique identifier to each snap instance name to distinguish them from the other(s). The identifier is an alphanumeric string, up to 10 characters in length, and it is added as a suffix to the snap name. This is a manual step, and you can choose anything you like for the identifier. For example, if you want to install GIMP with your own identifier, you can do something like:

snap install gimp_first

Technically, gimp_first does not exist as a snap, but snapd will be able to interpret the format of “snap name” “underscore” “unique identifier” and install the right software as a separate instance.

You have quite a bit of freedom choosing how you use this feature. You can install them each individually or indeed in parallel, e.g. snap install gimp_1 gimp_2 gimp_3. You can install a production version (e.g. snap install vlc) and then use unique identifiers for your test installs only. In fact, this may be the preferred way, as you will be able to clearly tell your different instances apart.

Testing 1 2 3

You can try parallel installs with any snap in the store. For example, let’s setup two instances of odio. Snapd will only download the snap package once, and then configure the two requested instances separately.

snap install odio_first odio_second
odio_second 1 from Canonical✓ installed
odio_first 1 from Canonical✓ installed

From here on, you can manage each instance in its own right. You can remove each one using its full name (including the identifier), connect and disconnect interfaces, start and stop services, create aliases, and more. For instance:

snap remove odio_second
odio_second removed

Different instances, different versions

It gets better. Not only can you have multiple instances, you can manage the release channel of each instance separately. So if you want to test different versions– which can really be helpful if you want to learn (and prepare for) what new editions of an application bring, you can do this in parallel to your production setup, without requiring additional hardware, operating system instances, users – or having to worry about potentially harming your environment.

snap info vlc
name:      vlc
summary:   The ultimate media player

channels:
stable:    3.0.7                      2019-06-07 (1049) 212MB -
candidate: 3.0.7                      2019-06-07 (1049) 212MB -
beta:      3.0.7.1-1-6-gdedb3bd       2019-06-18 (1071) 212MB -
edge:      4.0.0-dev-8388-gb425adb06c 2019-06-18 (1070) 329MB -

VLC is a good example, with stable version 3.0.7 available, and preview version 4.0.0 in the edge channel. If you already have multiple instances installed, you can just refresh one of them, e.g.: the aptly named vlc_edge instance:

snap refresh --edge vlc_edge

Or you can even directly install a different version as a separate instance:

snap install --candidate vlc_second
vlc_second (candidate) 3.0.7 from VideoLAN✓ installed

You can check your installed instances, and you will see the whole gamut of versions:

snap list| grep vlc
vlc         3.0.7          1049   stable     videolan*      -
vlc_edge    4.0.0-dev-...  1070 edge     videolan*      -
vlc_second  3.0.7          1049   candidate  videolan*     -

When parallel lines touch

For all practical purposes, these will be individual applications with their own home directory and data. In a way, this is quite convenient, but it can be problematic if your snaps require exclusive access to system resources, like sockets or ports. If you have a snap that runs a service, only one instance will be able to bind to a predefined port, while others will fail.

On the other hand, this is quite useful for testing the server-client model, or how different applications inside the snap work with one another. The namespace collisions as well as methods to share data using common directories are described in detail in the documentation. Parallel installs do offer a great deal of flexibility, but it is important to remember than most applications are designed to run individually on a system.

Summary

The value proposition of self-contained applications like snaps has been debated in online circles for years now, revolving around various pros and cons compared to installations from traditional repository channels. In many cases, there’s no clear-cut answer, however parallel installs do offer snaps a distinct, unparalleled [sic] advantage. You have the ability to run multiple instances, multiple versions of your applications in a safe, isolated manner.

At the moment, parallel installs are experimental, best suited for users comfortable with software testing. But the functionality does open a range of interesting possibilities, as it allows early access to new tools and features, while at the same time, you can continue using your production setup without any risk. If you have any comments or suggestions, please join our forum for a discussion.

Photo by Kholodnitskiy Maksim on Unsplash.

The post Parallel installs – test and run multiple instances of snaps appeared first on Ubuntu Blog.

Canonical Design Team: Vanilla Framework 2.0 upgrade guide

$
0
0

We have just released Vanilla Framework 2.0, Canonical’s SCSS styling framework, and – despite our best efforts to minimise the impact – the new features come with changes that will not be automatically backwards compatible with sites built using previous versions of the framework.

To make the transition to v2.0 easier, we have compiled a list of the major breaking changes and their solutions (when upgrading from v1.8+). This list is outlined below. We recommend that you treat this as a checklist while migrating your projects.

1. Spacing variable mapping

If you’ve used any of the spacing variables (they can be recognised as variables that start with $spv or $sph) in your Sass then you will need to update them before you can build CSS. The simplest way to update these variables is to find/replace them using the substitution values listed in the Vanilla spacing variables table.

2. Grid

2.1 Viewport-specific column names

Old classNew class
mobile-col-*col-small-*
tablet-col-*col-medium-*

2.2 Columns must be direct descendants of rows

Ensure .col-* are direct descendants of .row; this has always been the intended use of the pattern but there were instances where the rule could be ignored. This is no longer the case.

Additionally, any .col-*s that are not direct descendants will just span the full width of their container as a fallback.

You can see an example of correcting improperly-nested column markup in this ubuntu.com pull request.

2.3 Remove any Shelves grid functionality

The framework no longer includes Shelves, classes starting with prefix-, suffix-, push- and pull- and no longer supported but arbitrary positioning on our new grid is achieved by stating an arbitrary starting column using col-start- classes.

For example: if you want an eight-column container starting at the fourth column in the grid you would use the classes col-8 col-start-4.

You can read full documentation and an example in the Empty Columns documentation.

2.4 Fixed with containers with no columns

Previously, a .row with a single col-12 or a col-12 on its own may have been used to display content in a fixed-width container. The nested solution adds unnecessary markup and a lone col-12 will no longer work.

A simple way to make an element fixed width, use the utility .u-fixed-width, which does not need columns.

2.5 Canonical global nav

If your website makes use of the Canonical global navigation module (If so, hello colleague or community member!) then ensure that the ensure global nav width matches the new fixed-width (72rem by default). A typical implementation would look like the following HTML:

<scriptsrc="/js/global-nav.js"></script> <script>canonicalGlobalNav.createNav({maxWidth: '72rem'});</script>

3. Renamed patterns

Some class names have been marked for renaming or the classes required to use them have been minimised.

3.1 Stepped lists

We favour component names that sound natural in English to make the framework more intuitive. “list step” wasn’t a good name and didn’t explain its use very well so we decedided to rename it to the much more explicit “stepped list”.

In order to update the classes in your project search and replace the following:

Old class nameNew class name
.p-list-step.p-stepped-list
.p-list-step__item.p-stepped-list__item

3.2 Code snippet

“Code snippet” was an ambiguous name so we have renamed it to “code copyable” to indicate the major difference between it and other code variants.

Change the classes your code to the following:

Old class nameNew class name
.p-code-snippet.p-code-copyable

If you’ve extended the mixin then you’ll need to update the mixin name as follows:

Old mixin nameNew mixin name
vf-p-code-snippetvf-p-code-copyable

The p-tooltips class remains the same but you no longer need two classes to use the pattern because the modified tooltips now include all required styling. Markup can be simplified as follows (this is the same for all tooltip variants):

Old markupNew markup
<button class="p-tooltip p-tooltip--btm-center"…><button class="p-tooltip--btm-center"…>

4. Breakpoints

Media queries changed due to a WG proposal. Ensure any local media queries are aligned with the new ones. Also, update any hard-coded media queries (e.g. in the markup) to the new values. The new values can be found in the docs (local link)

5. Deprecated components

5.1 Footer (p-footer)

This component is now entirely removed with no direct replacement. Footers can be constructed with a standard p-strip, row markup.

5.2 Button switch (button.p-switch)

Buttons shouldn’t be used with the p-switch component and are no longer supported. Instead, use the much more semantic checkbox input instead.

5.3 Hidden, visible (u-hidden, u-visible)

These have been deprecated and the one visibility-controlling class format is u-hide (and the more specific variants – u-hide documentation)

5.4 Warning notification (p-notification–warning)

This name for the component has been deprecated and it is now only available as p-notification--caution

5.5 p-link–no-underline

This was an obsolete modifier for a removed version underlined links that used borders

5.6 Strong link (p-link–strong)

This has been removed with no replacement as it was an under-utilised component with no clear usage guidelines.

5.7 Inline image variants

The variants p-inline-images img and p-inline-images__img have been removed and the generic implementation now supports all requirements.

5.7 Sidebar navigation (p-navigation–sidebar)

For navigation, the core p-navigation component is recommended. If sidebar-like functionality is still required then if can be constructed with the default grid components.

5.7 Float utilities (p-float*)

To move them in-line with the naming conventions used elsewhere in the framework, u-float--right and u-float--left are now u-float-right and u-float-left (One “-” is removed to make them first-level components rather than modifers. This is to allow for modifiers for screen sizes).

6. (Optional) Do not wrap buttons / anchors in paragraphs.

We have CSS rules in place to ensure that wrapped buttons behave as if they aren’t, and we would like to remove this as it is unnecessary bloat. In order to do that, we need to ensure buttons are no longer wrapped. This back-support is likely to be deprecated in future versions of the framework.

7. Update stacked forms to use the grid (p-form–stacked).

The hard-coded widths (25%/75%) on labels and inputs have been removed. This will break any layouts that use them, so please wrap the form elements in .row>.col-*.

8. Replace references to $px variable

$px used to stand for 1px expressed as a rem value. This was used, for example, to calculate padding so that the padding plus the border equals a round rem value. This could no longer work once we introduced the font size increase at 1680px, because the value of 1rem changes from 16px to 18px.

Replace instances of this variable with calc({rem value} +/- 1px).

This means you need to replace e.g.:

Before: padding: $spv-nudge - $px $sph-intra--condensed * 1.5 - ($px * 2);

After: padding: calc(#{$spv-nudge} - 1px) calc(#{$sph-intra--condensed * 1.5} - 2px);

9. Replace references to $color-warning with $color-caution

This was a backwards compatibility affordance that had been deprecated for the last few releases.

10. (Optional) Try to keep text elements as siblings in the same container

Unless you really need to wrap in different containers, e.g. (emmet notation) div>h4+div>p, use div>h4+p. This way the page will benefit from the careful adjustments of white space using <element>+<element> css rules, i.e. p+p, p+h4 etc. Ignoring this won’t break the page, but the spacing between text elements will not be ideal.

11. $font-base-size is now a map of sizes

To allow for multiple base font sizes for different screen sizes, we have turned the $font-base-size variable into a map.

A quick fix to continue using the deprecated variable locally would be:

$font-base-size: map-get($base-font-sizes, base);

But, for a more future-proof version, you should understand and use the new map.

By default, the font-size of the root element (<html>) increases on screens larger than the value of $breakpoint-x-large. This means it can no longer be represented as a single variable. Instead, we use a map to store the two font sizes ($base-font-sizes). If you are using $font-base-size in your code, replace as needed with a value from the $base-font-sizes map.

That’s it

Following the previous steps should now have your project using the latest features of Vanilla 2.0. There may be more work updating your local code and removing any temporary local fixes for issues we have fixed since the last release but this will vary from project to project.

If you still need help then please contact us on twitter or refer to the full Vanilla Framework documentation.

If, in the process of using Vanilla, you find bugs then please reprot them as issues on Github where we also welcome pull request submissions from the community if you want to suggest a fix.

The post Vanilla Framework 2.0 upgrade guide appeared first on Ubuntu Blog.

Ubuntu Podcast from the UK LoCo: S12E11 – 1942

$
0
0

This week we’ve been to FOSS Talk Live and created games in Bash. We have a little LXD love in and discuss 32-bit Intel being dropped from Ubuntu 19.10. OggCamp tickets are on sale and we round up some tech news.

It’s Season 12 Episode 11 of the Ubuntu Podcast! Alan Pope, Mark Johnson and Martin Wimpress are connected and speaking to your brain.

In this week’s show:

  • We discuss what we’ve been up to recently:

That’s all for this week! You can listen to the Ubuntu Podcast back catalogue on YouTube. If there’s a topic you’d like us to discuss, or you have any feedback on previous shows, please send your comments and suggestions to show@ubuntupodcast.org or Tweet us or Toot us or Comment on our Facebook page or comment on our sub-Reddit.

Canonical Design Team: Kubernetes on Mac: how to set up

$
0
0

MicroK8s can be used to run Kubernetes on Mac for testing and developing apps on macOS.

MicroK8s is the local distribution of Kubernetes developed by Ubuntu. It’s a compact Linux snap that installs a single node cluster on a local PC. Although MicroK8s is only built for Linux, Kubernetes on Mac works by setting up a cluster in an Ubuntu VM.

It runs all Kubernetes services natively on Ubuntu and any operating system (OS) which supports snaps. This is beneficial for testing and building apps, creating simple Kubernetes clusters and developing microservices locally –  essentially all dev work that needs deployment.

MicroK8s provides another level of reliability because it provides the most current version of Kubernetes for development. The latest upstream version of Kubernetes is always available on Ubuntu within one week of official release.

Kubernetes and MicroK8s both need a Linux kernel to work and require an Ubuntu VM as mentioned above. Mac users also need Multipass, the tool for launching Ubuntu VMs on Mac, Windows and Linux.

Here are instructions to set up Multipass and to run Kubernetes on Mac.

Install a VM for Mac using Multipass

Make enough resources available for hosting. Below, we’ve created a VM named microk8s-vm and given it 4GB of RAM and 40GB of disk.

multipass launch --name microk8s-vm --mem 4G --disk 40G
multipass exec microk8s-vm -- sudo snap install microk8s --classic
multipass exec microk8s-vm -- sudo iptables -P FORWARD ACCEPT

The VM has an IP that can be checked with the following: (Take note of this IP since our services will become available here).

multipass list
Name             State IPv4            Release
microk8s-vm      RUNNING 192.168.64.1   Ubuntu 18.04 LTS

Interact with MicroK8s on the VM

This can be done in three ways:

  • Using a Multipass shell prompt (command line) by running:
multipass shell microk8s-vm                                                                                     
  • Using multipass exec to execute a command without a shell prompt by inputting:
multipass exec microk8s-vm -- /snap/bin/microk8s.status                             
  • Using the Kubernetes API server running in the VM. Here one would use MicroK8s kubeconfig file with a local installation of kubectl to access the in-VM-kubernetes. Do this by running:
multipass exec microk8s-vm -- /snap/bin/microk8s.config > kubeconfig     

Next, install kubectl on the host machine and then use the kubeconfig:

kubectl --kubeconfig=kubeconfig get all --all-namespaces            
NAMESPACE  NAME  TYPE  CLUSTER-IP   EXTERNAL-IP   PORT(S)   AGE        
Default service/kubernetes ClusterIP 10.152.183.1 <none> 443/TCP 3m12s

Accessing in-VM Multipass services – enabling MicroK8s add-ons

A basic MicroK8s add-on to setup is the Grafana dashboard. Below we show one way of accessing Grafana to monitor and analyse a MicroK8s instance. To do this execute:

multipass exec microk8s-vm -- /snap/bin/microk8s.enable dns dashboard
Enabling DNS
Applying manifest
service/kube-dns created
serviceaccount/kube-dns created
configmap/kube-dns created
deployment.extensions/kube-dns created
Restarting kubelet
DNS is enabled
Enabling dashboard
secret/kubernetes-dashboard-certs created
serviceaccount/kubernetes-dashboard created
deployment.apps/kubernetes-dashboard created
service/kubernetes-dashboard created
service/monitoring-grafana created
service/monitoring-influxdb created
service/heapster created
deployment.extensions/monitoring-influxdb-grafana-v4 created
serviceaccount/heapster created
configmap/heapster-config created
configmap/eventer-config created
deployment.extesions/heapster-v1.5.2 created
dashboard enabled

Next, check the deployment progress by running:

multipass exec microk8s-vm -- /snap/bin/microk8s.kubectl get all --all-namespaces                                                                                                                        

Which should return output similar to:

Kubernetes-on-Mac-namespaces-for-MicroK8s

Once all the necessary services are running, the next step is to access the dashboard, for which we need a URL to visit. To do this, run:

multipass exec microk8s-vm -- /snap/bin/microk8s.kubectl cluster-info  
Kubernetes master is running at https://127.0.0.1:16443
Heapster is running at https://127.0.0.1:16443/api/v1/namespaces/kube-system/services/heapster/proxy
KubeDNS is running at https://127.0.0.1:16443/api/v1/namespaces/kube-system/services/kube-dns:dns/proxy
Grafana is running at https://127.0.0.1:16443/api/v1/namespaces/kube-system/services/monitoring-grafana/proxy
InfluxDB is running at https://127.0.0.1:16443/api/v1/namespaces/kube-system/services/monitoring-influxdb:http/proxy

To further debug and diagnose cluster problems, use 'kubectl cluster-info dump'.

If we were inside the VM, we could access the Grafana dashboard by visiting: this URL But, we want to access the dashboard from the host (i.e. outside the VM). We can use a proxy to do this:

multipass exec microk8s-vm -- /snap/bin/microk8s.kubectl proxy --address='0.0.0.0' --accept-hosts='.*' 
Starting to serve on [::][::]:8001

Leave the Terminal open with this command running and take note of the port (8001). We will need this next.

To visit the Grafana dashboard, we need to modify the in-VM dashboard URL by:

Kubernetes on Mac in summary

Building apps that are easy to scale and distribute has taken pride-of-place for developers and DevOp teams. Developing and testing apps locally using MicroK8s should help teams to deploy their builds faster.

Useful reading

The post Kubernetes on Mac: how to set up appeared first on Ubuntu Blog.

Jonathan Riddell: Plasma Vision

$
0
0

The Plasma Vision got written a couple years ago, a short text saying what Plasma is and hopes to create and defines our approach to making a useful and productive work environment for your computer.  Because of creative differences it was never promoted or used properly but in my quest to make KDE look as up to date in its presence on the web as it does on the desktop I’ve got the Plasma sprinters who are meeting in Valencia this week to agree to adding it to the KDE Plasma webpage.


Canonical Design Team: ROS 2 Command Line Interface

$
0
0

Disclosure: read the post until the end, a surprise awaits you!

Moving from ROS 1 to ROS 2 can be a little overwhelming.
It is a lot of (new) concepts, tools and a large codebase to get familiar with. And just like many of you, I am getting started with ROS 2.

One of the central pieces of the ROS ecosystem is its Command Line Interface (CLI). It allows for performing all kind of actions; from retrieving information about the codebase and/or the runtime system, to executing code and of course helping debugging in general. It’s a very valuable set of tools that ROS developers use on a daily basis. Fortunately, pretty much all of those tools were ported from ROS 1 to ROS 2.

To those already familiar with ROS, the ROS 2 CLI wording will sound very familiar. Commands such as roslaunch is ported to ros2 launch, rostopic becomes ros2 topic while rosparam is now ros2 param.
Noticed the pattern already ? Yes that’s right ! The keyword ‘ros2‘ has become the unique entry-point for the CLI.

So what ? ROS CLI keywords where broke in two and that’s it ?


Well, yes pretty much.

Every command starts with the ros2 keyword, followed by a verb, a sub-verb and possibly positional/optional arguments. The pattern is then,

$ ros2 verbsub-verb<positional-argument> <optional-arguments>

Notice that throughout the CLI, the auto-completion (the infamous [tab][tab]) is readily available for verbs, sub-verbs and most positional arguments. Similarly, helpers are available at each stage,

$ ros2 verb --help
$ ros2 verb sub-verb -h

Let us see a few examples,

$ ros2 run demo_node_cpp talker
starts the talker cpp node from the demo_nodes_cpp package.

$ ros2 run demo_node_py listener
starts the listener python node from the demo_nodes_py package.

$ ros2 topic echo /chatter
outputs the messages sent from the talker node.

$ ros2 node info /listener
outputs information about the listener node.

$ ros2 param list
lists all parameters of every node.

Fairly similar to ROS 1 right ?

Missing CLI tools

We mentioned earlier that most of the CLI tools were ported to ROS 2, but not all. We believe such missing tools is one of the barriers to greater adoption of ROS 2, so we’ve started added some that we noticed were missing. Over the past week we contributed 5 sub-verbs, including one that is exclusive to ROS 2. Let us briefly review them,

$ ros2 topic find <message-type>
outputs a list of all topics publishing messages of a given type (#271).

$ ros2 topic type <topic-name>
outputs the message type of a given topic (#272).

$ ros2 service find <service-type>
outputs a list of all services of a given type (#273).

$ ros2 service type <service-name>
outputs the service type of a given service (#274).

This tools are pretty handy by themselves, especially to debug and grasp an overview of a running system. And they become even more interesting when combined, say, in handy little scripts,

$ ros2 topic pub /chatter $(ros2 topic type /chatter) "data: Hello ROS 2 Developers"

Advertisement:
Have you ever looked for the version of a package you are using ?
Ever wondered who is the package author ?
Or which other packages it depends upon ?
All of this information, locked in the package’s xml manifest is now easily available at the tip of your fingers !

The new sub-verb we introduced allows one to retrieve any information contained in a package xml manifest (#280). The command,

$ ros2 pkg xml <package-name>
outputs the entirety of the xml manifest of a given package.
To retrieve solely a piece of it, or a tag in xml wording, use the --tag option,

$ ros2 pkg xml <package-name> --tag <tag-name>

A few examples are (at the time of writing),

$ ros2 pkg xml demo_nodes_cpp --tag version
0.7.6

$ ros2 pkg xml demo_nodes_py -t author
Mikael Arguedas
Esteve Fernandez

$ ros2 pkg xml intra_process_demo -t build_depend libopencv-dev
rclcpp
sensor_msgs
std_msgs

This concludes our brief review of the changes that ROS 2 introduced to the CLI tools.

Before leaving, let me offer you a treat.

— A ROS 2CLI Cheats Sheet that we put together —

Feel free to share it, print and pin it above your screen but also contribute to it as it is hosted on github !

Cheers.

The post ROS 2 Command Line Interface appeared first on Ubuntu Blog.


Costales: Podcast Ubuntu y otras hierbas S03E06: Huawei y Android; IoT ¿más intrusión en los hogares?

$
0
0
Paco Molinero, Fernando Lanero y Marcos Costales debatiremos sobre la polémica de Huawei con el Gobierno de los Estados Unidos. Además hablaremos sobre los problemas de privacidad y seguridad de los dispositivos conectados al Internet de las Cosas.

Ubuntu y otras hierbas
Escúchanos en:

Simos Xenitellis: I am running Steam/Wine on Ubuntu 19.10 (no 32-bit on the host)

$
0
0

I like to take care of my desktop Linux and I do so by not installing 32-bit libraries. If there are any old 32-bit applications, I prefer to install them in a LXD container. Because in a LXD container you can install anything, and once you are done with it, you delete it and poof it is gone forever!

In the following I will show the actual commands to setup a LXD container for a system with an NVidia GPU so that we can run graphical programs. Someone can take these and make some sort of easy-to-use GUI utility. Note that you can write a GUI utility that uses the LXD API to interface with the system container.

Prerequisites

You are running Ubuntu 19.10.

You are using the snap package of LXD.

You have an NVidia GPU.

Setting up LXD (performed once)

Install LXD.

sudo snap install lxd

Set up LXD. Accept all defaults. Add your non-root account to the lxd group. Replace myusername with your own username.

sudo lxd init
usermod -G lxd -a myusername
newgrp lxd

You have setup LXD. Now you can create containers.

Creating the system container

Launch a system container. You can create as many as you wish. This one we will call steam and will put Steam in it.

 lxc launch ubuntu:18.04 steam

Create a GPU passthrough device for your GPU.

lxc config device add steam gt2060 gpu

Create a proxy device for the X11 Unix socket of the host to this container. The proxy device is called X0. The abstract Unix socket @/tmp/.X11-unix/X0 of the host is proxied into the container. The 1000/1000 is the UID and GID of your desktop user on the host.

lxc config device add steam X0 proxy listen=unix:@/tmp/.X11-unix/X0 connect=unix:@/tmp/.X11-unix/X0 bind=container security.uid=1000 security.gid=1000 

Get a shell into the system container.

lxc exec steam -- sudo --user ubuntu --login

Add the NVidia 430 driver to this Ubuntu 18.04 LTS container, using the PPA. The driver in the container has to match the driver on the host. This is an NVidia requirement.

sudo add-apt-repository ppa:graphics-drivers/ppa 

Install the NVidia library, both 32-bit and 64-bit. Also install utilities to test X11, OpenGL and Vulkan.

sudo apt install -y libnvidia-gl-430 sudo apt install -y libnvidia-gl-430:i386
sudo apt install -y x11-apps mesa-utils vulkan-utils 

Set the $DISPLAY. You can add this into ~/.profile as well.

export DISPLAY=:0
echo export DISPLAY=:0 >> ~/.profile

Enjoy by testing X11, OpenGL and Vulkan.

xclock 
glxinfo
vulkaninfo
xclock X11 application running in a LXD container
ubuntu@steam:~$ glxinfo
 name of display: :0
 display: :0  screen: 0
 direct rendering: Yes
 server glx vendor string: NVIDIA Corporation
 server glx version string: 1.4
 server glx extensions:
     GLX_ARB_context_flush_control, GLX_ARB_create_context, 
...
ubuntu@steam:~$ vulkaninfo 
===========
VULKANINFO
===========

Vulkan Instance Version: 1.1.101


Instance Extensions:
====================
Instance Extensions    count = 16
     VK_EXT_acquire_xlib_display         : extension revision  1
...

The system is now ready to install Steam, and also Wine!

Installing Steam

We grab the deb package of Steam and install it.

wget https://steamcdn-a.akamaihd.net/client/installer/steam.deb
sudo dpkg -i steam.deb
sudo apt install -f

Then, we run it.

steam

Here is some sample output.

ubuntu@steam:~$ steam
 Running Steam on ubuntu 18.04 64-bit
 STEAM_RUNTIME is enabled automatically
 Pins up-to-date!
 Installing breakpad exception handler for appid(steam)/version(0)
 Installing breakpad exception handler for appid(steam)/version(1.0)
 Installing breakpad exception handler for appid(steam)/version(1.0)
...

Installing Wine

Here is how you install Wine in the container.

sudo dpkg --add-architecture i386 
wget -nc https://dl.winehq.org/wine-builds/winehq.key
sudo apt-key add winehq.key
sudo apt update
sudo apt install --install-recommends winehq-stable

Conclusion

There are options to run legacy 32-bit software, and here we show how to do that using LXD containers. We pick NVidia (closed-source drivers) which entails a bit of extra difficulty. You can create many system containers and put in them all sorts of legacy software. Your desktop (host) remains clean and when you are done with a legacy app, you can easily remove the container and it is gone!

Full Circle Magazine: Full Circle Weekly News #136

$
0
0

Canonical Design Team: Statement on 32-bit i386 packages for Ubuntu 19.10 and 20.04 LTS

$
0
0

Thanks to the huge amount of feedback this weekend from gamers, Ubuntu Studio, and the WINE community, we will change our plan and build selected 32-bit i386 packages for Ubuntu 19.10 and 20.04 LTS.

We will put in place a community process to determine which 32-bit packages are needed to support legacy software, and can add to that list post-release if we miss something that is needed.

Community discussions can sometimes take unexpected turns, and this is one of those. The question of support for 32-bit x86 has been raised and seriously discussed in Ubuntu developer and community forums since 2014. That’s how we make decisions.

After the Ubuntu 18.04 LTS release we had extensive threads on the ubuntu-devel list and also consulted Valve in detail on the topic. None of those discussions raised the passions we’ve seen here, so we felt we had sufficient consensus for the move in Ubuntu 20.04 LTS. We do think it’s reasonable to expect the community to participate and to find the right balance between enabling the next wave of capabilities and maintaining the long tail. Nevertheless, in this case it’s relatively easy for us to change plan and enable natively in Ubuntu 20.04 LTS the applications for which there is a specific need.

We will also work with the WINE, Ubuntu Studio and gaming communities to use container technology to address the ultimate end of life of 32-bit libraries; it should stay possible to run old applications on newer versions of Ubuntu. Snaps and LXD enable us both to have complete 32-bit environments, and bundled libraries, to solve these issues in the long term.

There is real risk to anybody who is running a body of software that gets little testing. The facts are that most 32-bit x86 packages are hardly used at all. That means fewer eyeballs, and more bugs. Software continues to grow in size at the high end, making it very difficult to even build new applications in 32-bit environments. You’ve heard about Spectre and Meltdown – many of the mitigations for those attacks are unavailable to 32-bit systems.

This led us to stop creating Ubuntu install media for i386 last year and to consider dropping the port altogether at a future date.  It has always been our intention to maintain users’ ability to run 32-bit applications on 64-bit Ubuntu – our kernels specifically support that.

The Ubuntu developers remain committed as always to the principle of making Ubuntu the best open source operating system across desktop, server, cloud, and IoT.  We look forward to the ongoing engagement of our users in continuing to make this principle a reality.

The post Statement on 32-bit i386 packages for Ubuntu 19.10 and 20.04 LTS appeared first on Ubuntu Blog.

Riccardo Padovani: Using AWS Textract in an automatic fashion with AWS Lambda

$
0
0

During the last AWS re:Invent, back in 2018, a new OCR service to extract data from virtually any document has been announced. The service, called Textract, doesn’t require any previous machine learning experience, and it is quite easy to use, as long as we have just a couple of small documents. But what if we have millions of PDF of thousands of page each? Or what if we want to analyze documents loaded by users?

In that case, we need to invoke some asynchronous APIs, poll an endpoint to check when it has finished working, and then read the result, which is paginated, so we need multiple APIs call. Wouldn’t be super cool to just drop files in an S3 bucket, and after some minutes, having their content in another S3 bucket?

Let’s see how to use AWS Lambda, SNS, and SQS to automatize all the process!

Overview of the process

This is the process we are aiming to build:

  1. Drop files to an S3 bucket;
  2. A trigger will invoke an AWS Lambda function, which will inform AWS Textract of the presence of a new document to analyze;
  3. AWS Textract will do its magic, and push the status of the job to an SNS topic, that will post it over an SQS topic;
  4. The SQS topic will invoke another Lambda function, which will read the status of the job, and if the analysis was successful, it downloads the extracted text and save to another S3 bucket (but we could replace this with a write over DynamoDB or others database systems);
  5. The Lambda function will also publish the state over Cloudwatch, so we can trigger alarms when a read was unsuccessful.

Since a picture is worth a thousand words, let me show a graph of this process.

Textract structure

While I am writing this, Textract is available only in 4 regions: US East (Northern Virginia), US East (Ohio), US West (Oregon), and EU (Ireland). I strongly suggest therefore to create all the resources in just one region, for the sake of simplicity. In this tutorial, I will use eu-west-1.

S3 buckets

First of all, we need to create two buckets: one for our raw file, and one for the JSON file with the extracted test. We could also use the same bucket, theoretically, but with two buckets we can have better access control.

Since I love boring solutions, for this tutorial I will call the two buckets textract_raw_files and textract_json_files. If necessary, official documentation explains how to create S3 buckets.

Invoke Textract

The first part of the architecture is informing Textract of every new file we upload to S3. We can leverage the S3 integration with Lambda: each time a new file is uploaded, our Lambda function is triggered, and it will invoke Textract.

The body of the function is quite straightforward:

from urllib.parse import unquote_plus

import boto3

s3_client = boto3.client('s3')
textract_client = boto3.client('textract')

SNS_TOPIC_ARN = 'arn:aws:sns:eu-west-1:123456789012:AmazonTextract'    # We need to create this
ROLE_ARN = 'arn:aws:iam::123456789012:role/TextractRole'   # This role is managed by AWS

def handler(event, _):
    for record in event['Records']:
        bucket = record['s3']['bucket']['name']
        key = unquote_plus(record['s3']['object']['key'])

        print(f'Document detection for {bucket}/{key}')

        textract_client.start_document_text_detection(
            DocumentLocation={'S3Object': {'Bucket': bucket, 'Name': key}},
            NotificationChannel={'RoleArn': ROLE_ARN, 'SNSTopicArn': SNS_TOPIC_ARN})

You can find a copy of this code hosted over Gitlab.

As you can see, we receive a list of freshly uploaded files, and for each one of them, we ask Textract to do its magic. We also ask it to notify us, when it has finished its work, sending a message over SNS. We need therefore to create an SNS topic. It is well explained how to do so in the official documentation.

When we have finished, we should have something like this:

SNS topic

We copy the ARN of our freshly created topic and insert it in the script above in the variable SNS_TOPIC_ARN.

Now we need to actually create our Lambda function: once again the official documentation is our friend if we have never worked with AWS Lambda before.

Since the only requirement of the script is boto3, and it is included by default in Lambda, we don’t need to create a custom package.

At least, this is usually the case :-) Unfortunately, while I am writing this post, boto3 on Lambda is at version boto3-1.9.42, while support for Textract landed only in boto3-1.9.138. We can check which version is currently on Lambda from this page, under Python Runtimes: if boto3 has been updated to a version >= 1.9.138, we don’t have to do anything more than simply create the Lambda function. Otherwise, we have to include a newer version of boto3 in our Lambda function. But fear not! The official documentation explains how to create a deployment package.

We need also to link an IAM role to our Lambda function, which requires some additional permission:

  • AmazonTextractFullAccess: this gives access also to SNS, other than Textract
  • AmazonS3ReadOnlyAccess: if we want to be a bit more conservative, we can give access to just the textract_raw_files bucket.

Of course, other than that, the function requires the standard permissions to be executed and to write on Cloudwatch: AWS manages that for us.

We are almost there, we need only to create the trigger: we can do that from the Lambda designer! From the designer we select S3 as the trigger, we set our textract_raw_files bucket, and we select All object create events as Event type.

If we implemented everything correctly, we can now upload a PDF file to the textract_raw_files, and over Cloudwatch we should be able to see the log of the Lambda function, which should say something similar to Document detection for textract_raw_files/my_first_file.pdf.

Now we only need to read the extracted text, all the hard work has been done by AWS :-)

Read data from Textract

AWS Textract is so kind to notify us when it has finished extracting data from PDFs we provided: we create a Lambda function to intercept such notification, invoke AWS Textract and save the result in S3.

The Lambda function needs also to support pagination in the results, so the code is a bit longer:

import json
import boto3

textract_client = boto3.client('textract')
s3_bucket = boto3.resource('s3').Bucket('textract_json_files')


def get_detected_text(job_id: str, keep_newlines: bool = False) -> str:
    """
    Giving job_id, return plain text extracted from input document.
    :param job_id: Textract DetectDocumentText job Id
    :param keep_newlines: if True, output will have same lines structure as the input document
    :return: plain text as extracted by Textract
    """
    max_results = 1000
    pagination_token = None
    finished = False
    text = ''

    while not finished:
        if pagination_token is None:
            response = textract_client.get_document_text_detection(JobId=job_id,
                                                                   MaxResults=max_results)
        else:
            response = textract_client.get_document_text_detection(JobId=job_id,
                                                                   MaxResults=max_results,
                                                                   NextToken=pagination_token)

        sep = ' ' if not keep_newlines else '\n'
        text += sep.join([x['Text'] for x in response['Blocks'] if x['BlockType'] == 'LINE'])

        if 'NextToken' in response:
            pagination_token = response['NextToken']
        else:
            finished = True

    return text


def handler(event, _):
    for record in event['Records']:
        message = json.loads(record['Sns']['Message'])
        job_id = message['JobId']
        status = message['Status']
        filename = message['DocumentLocation']['S3ObjectName']

        print(f'JobId {job_id} has finished with status {status} for file {filename}')

        if status != 'SUCCEEDED':
            return

        text = get_detected_text(job_id)
        to_json = {'Document': filename, 'ExtractedText': text, 'TextractJobId': job_id}
        json_content = json.dumps(to_json).encode('UTF-8')
        output_file_name = filename.split('/')[-1].rsplit('.', 1)[0] + '.json'
        s3_bucket.Object(f'{output_file_name}').put(Body=bytes(json_content))

        return message

You can find a copy of this code hosted over Gitlab.

Again, this code has to be published as a Lambda function. As before, it shouldn’t need any special configuration, but since it requires boto3 >= 1.9.138 we have to create a deployment package, as long as AWS doesn’t update their Lambda runtime.

After we have uploaded the Lambda function, from the control panel we set as trigger SNS, specifying as ARN the ARN of the SNS topic we created before - in our case, arn:aws:sns:eu-west-1:123456789012:AmazonTextract.

We need also to give the IAM role which executes the Lambda function new permissions, in addition to the ones it already has. In particular, we need:

  • AmazonTextractFullAccess
  • AmazonS3FullAccess: in production, we should give access to just the textract_json_files bucket.

This should be the final result:

Lambda Configuration

And that’s all! Now we can simply drop any document in a supported format to the textract_raw_files bucket, and after some minutes we will find its content in the textract_json_files bucket! And the quality of the extraction is quite good.

Known limitations

Other than being available in just 4 locations, at least for the moment, AWS Textract has other known hard limitations:

  • The maximum document image (JPEG/PNG) size is 5 MB.
  • The maximum PDF file size is 500 MB.
  • The maximum number of pages in a PDF file is 3000.
  • The maximum PDF media size for the height and width dimensions is 40 inches or 2880 points.
  • The minimum height for text to be detected is 15 pixels. At 150 DPI, this would be equivalent to 8-pt font.
  • Documents can be rotated a maximum of +/- 10% from the vertical axis. Text can be text aligned horizontally within the document.
  • Amazon Textract doesn’t support the detection of handwriting.

It has also some soft limitations that make it unsuitable for mass ingestion:

  • Transactions per second per account for all Start (asynchronous) operations: 0.25
  • Maximum number of asynchronous jobs per account that can simultaneously exist: 2

So, if you need it for anything but testing, you should open a ticket to ask for higher limits, and maybe poking your point of contact in AWS to speed up the process.

That’s all for today, I hope you found this article useful! For any comment, feedback, critic, write to me on Twitter (@rpadovani93) or drop an email at riccardo@rpadovani.com.

Regards,
R.

Viewing all 17727 articles
Browse latest View live